This guide tells you exactly what to do to remove bike chain links without specialized tools, using or not using the master link.
Research by Statista Trusted Source Cycling - Statistics & Facts | Statista Cycling, also known as biking, is a popular leisure activity and, in many cases, a means of transportation. In 2016, around 12.4 percent of Americans cycled on a regular basis. The number of cyclists/bike riders in the U.S. has increased over the past three years from around 43 million to 47.5 million in 2017. www.statista.com asserts that the number of cyclists in the US is on an upward trend, with 47.5 bikers recorded in 2017. If you’re part of this bicycle-loving demographic, taking off a bike chain is a skill you’ll have to develop. There are multiple reasons for removing and replacing your bike chain without tools. One example is to allow for crisper and smoother gear changes.
Other reasons include extra reliability and smoother running of the bike. Ultimately, you’ll need to know how to remove a bike chain without tools. One reason is that you may not always have tools to help you out.
How to change a bike chain without a chain tool? Your ability to remove the chain without tools is dependent on the presence of a master link. According to Wikipedia Trusted Source Master link - Wikipedia master link or quick-release link is a roller chain accessory that allows convenient connection and disconnection of a chain without the need for a chain tool. It acts as a set of the chain’s outer plates, so joining two sets of the chain’s inner plate ends. Such master links may or may not be re-usable. en.wikipedia.org , a master link is a chain accessory that makes connecting and disconnecting the chain without relying on tools possible. As such, the first thing you need to do is find this crucial component.
Users recommend the ZONKIE 5/6/7/8 Speed Bike Chain for those who currently don’t have but want to move to a chain with a master link. It’s reusable, easy to clean, and is constructed durably enough to stave off rust and corrosion.
If you’re sure your chain already has a master link, here are the steps to locating it.
Step 1
Flip the bike so that both the handlebars and the seat act as support. This will also give you leeway to manipulate the chain.
Step 2
Change the bicycle gear to the lowest and loosest setting. Disconnecting the master link requires reduced tension in the chain.
Step 3
Of course, if your chain has been in use, it will be dirty, grimy, greasy, or even muddy, making it impossible to differentiate between regular chain links and the master link. Consequently, cleaning the chain is next on the agenda.
Step 4
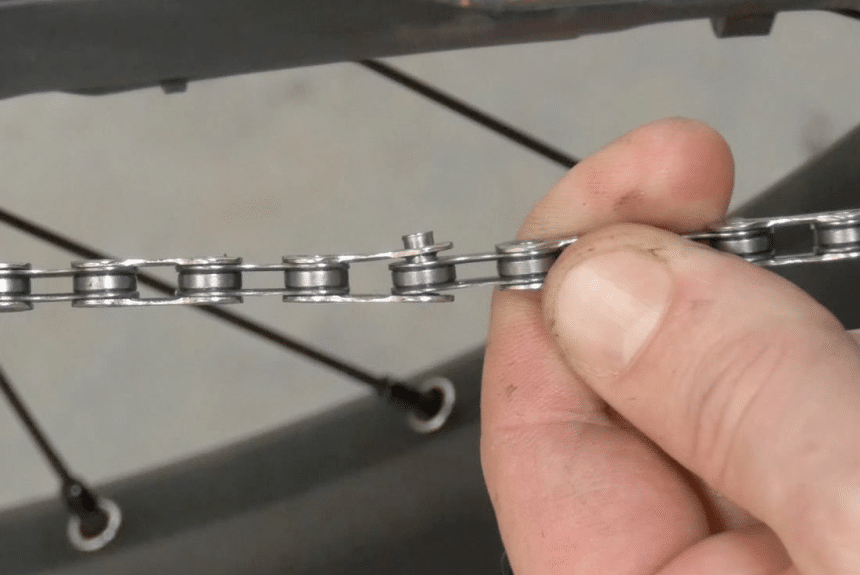
Next, you look for an outer plate link that looks and feels different from the rest. It may be a different color. However, the paint on these links tends to fade over time, so it may not help you differentiate between the master link and other links.
You’ll also notice that most of the outer links are perfectly identical to each other, with no space between the inner plates and outer plates where the pins are located. However, with some master links, there may be some space between the inner and outer plates where the pins/rivets are located.
Furthermore, there may be some open grooves extending from the rivet inwards on the master link. Lastly, some master links come with clips on top of the plate.
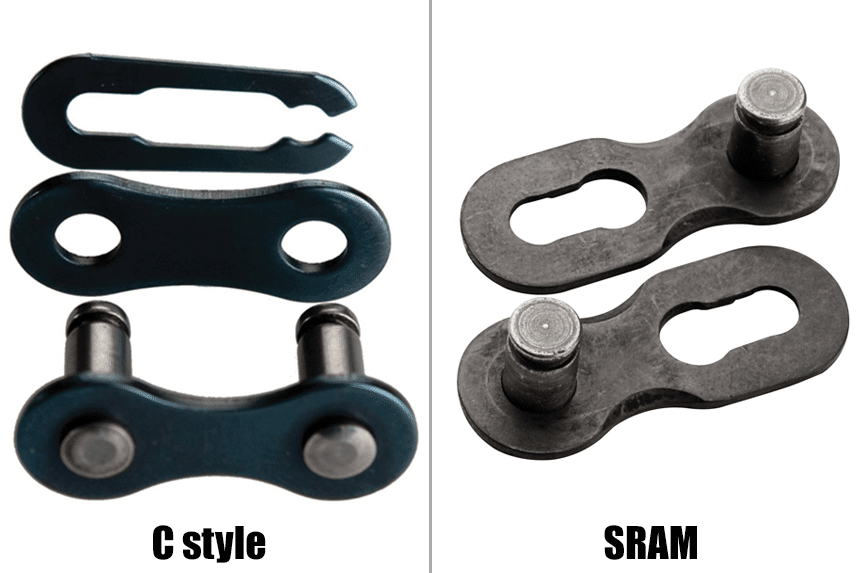
The “C style” and “SRAM” are the two major types of master links available for bicycle chains. If you want to know how to take off a bike chain without breaking it and using tools, you’ll need to know the difference.
Typically, SRAM master links come in two plate configurations. Each plate features an attached rivet/pin on one side and a slot for the opposing pin to slide into on the opposite side.
Consequently, each pin will slide into one of the inner plates and then slide into the slot provided on the other plate of the master link. The pins are thick at the top but thinner near the middle.
As for the slots mentioned above, they’re relatively long and have a large hole that fits the pin easily. That said, they also have narrow ends where the pin is ultimately supposed to end up. The resulting structure looks like a keyhole buttonhole.
These links are dependent on tension to keep the chain intact. Consequently, issues with the tension can cause problems and may even lead to the chain coming off.
Next is the C Style master link with both rivets attached to one plate. Consequently, the other plate just includes slots for the rivets to slide into. There’s also a clip with cutouts provided to hold the second plate in place. The clip works in conjunction with the incorporated grooves near the tops of the rivets.
Since you would have to remove the clip to remove a C-style link, it’s more reliable even when there are changes in tension. Nevertheless, the extra component, namely the clip, makes this link a bit bulkier. Consequently, you can put it on a mountain bike, but it doesn’t work for bicycles that use thinner chains, e.g., those with more than nine gears.
If you want an easier time removing master links, master link pliers may be necessary. According to reviewers, the MLP-1.2 Park Tool Link Pliers are ideal, made in America, and work with 5-speed to 11-speed derailleur chains. That said, here’s how to remove a bike chain without breaking it and using additional tools.
We’re assuming you followed steps 1 through 4 given above.
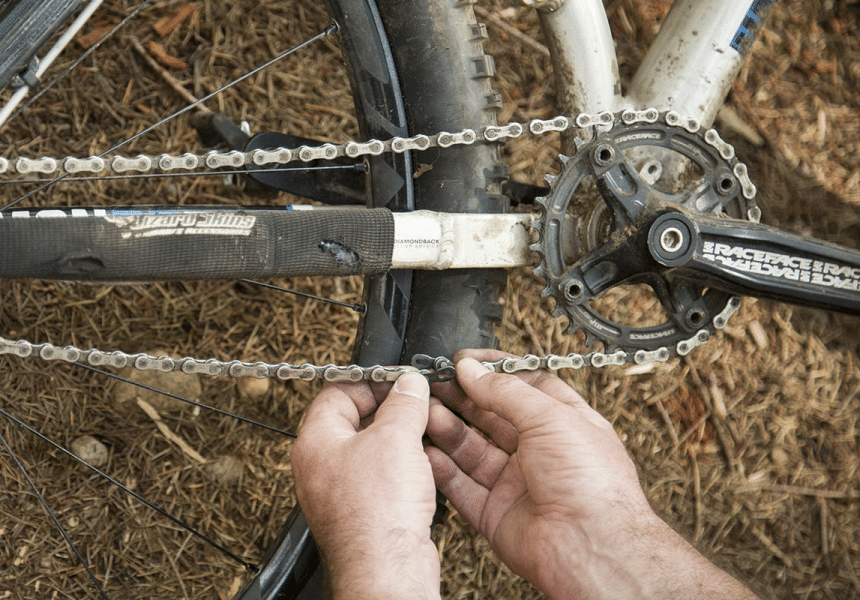
If it’s an SRAM, hold the ends of the plates with the rivets between your fingers. Consequently, one finger should be on top of the chain, while the other is positioned across it on the master link.
This will allow you to depress the master link on both ends when you push your fingers together. Remember we mentioned that the pins are thinner near the middle. As such, if you depress the plate, it will slide to the narrow section of the pin, which means you can move it freely using your fingers across the “keyhole button” slot.
After that, if you slide the plate in opposite directions, you’ll move the pins to the wide hole in the “keyhole button” slot, and then the link can easily come off the chain. In some cases, you can’t depress the plates with your fingers. Here you’ll need alternatives, and pliers or something like a shoelace can come in handy.
Remember, the goal is to move the link, so the wide hole in the slot is aligned with the rivets. You can push a shoelace through the spaces at the ends of the master link. You’ll then cross the ends of the lace, like you would in the first step of tying a shoelace. After that, you pull these ends as hard as you can in opposite directions.
This will pull the ends of the master link together until the rivets click into place in the wide hole. After that, the links come off easily from the chain, and you only need to separate them with your fingers.
Everything else can be separated with the use of your fingers after that.
You can still avoid using specialized tools such as the master link, but it’s impossible to do with your bare hands. You’ll need a thin piece of metal that’s about the size of the rivets in your chain. It could be a nail, a thin screwdriver, or another make-shift tool.
Next, you’ll need a surface to place your chain with a space that will allow the rivet to go through. The goal is to position the nail/screwdriver at the center of the rivet. After that, you use something heavy, e.g., a hammer or a rock, to hit the top of the nail/screwdriver until it pushes the rivet out of the hole.
Unfortunately, no matter how you push the rivet out, it will expand the hole on the chain link on the way out. This includes even when you use a thinner nail/screwdriver than the pin. Consequently, you can’t use the same rivet to re-attach the chain as it’ll result in a loose connection.
Whether you’re attaching a new chain or re-attaching it after doing some repairs, here’s the information you need before you can put it back on the bike. For the SRAM, you’ll insert the rivets into the holes on the inner plates as the first step.
After that, insert the rivets into the corresponding wide holes on the secondary plates. Remember, these holes are part of a larger slot that tapers as it extends to the edge of the plate. Finally, you’ll pull the chain to increase the tension and push the rivets to the thin sides of these slots.
If you don’t have enough strength for the same, the bike can help you out. Just change it to the highest and tightest gear setting and rotate the pedals slowly. This will increase the tension, and you’ll likely hear an audible pop when the rivets slide into place. You can double-check with your eyes before proceeding.
Once the second plate is in place, you can push in the clip until it clicks into position, just like you would a clothespin. Notably, you should orient it, so the open end is facing the direction the chain is pulled towards as you cycle.
For chain links without a master link, you’ll need to remember the hole left in the chain is now wider. This is where master chain rivets come in. They’re thicker than other rivets. Also, they feature a tapered end. As such, you can easily push the tapered end through the hole until the thicker end sits flush with one end of the hole.
After that, you break off the tapered end that’s poking out of the hole to give a flush finish as well. Finish up by tightening your bike chain before hopping on to take a ride.
Removing and even putting the chain back on the bike isn’t very challenging, especially when a master link is included. Also, you could buy one and include it in your bike setup even if it wasn’t included in the initial purchase. After that, detaching and re-attaching your chain whenever you need to will be a cakewalk.